Design of the Month · March 2009
-
"London Kitchen Door"
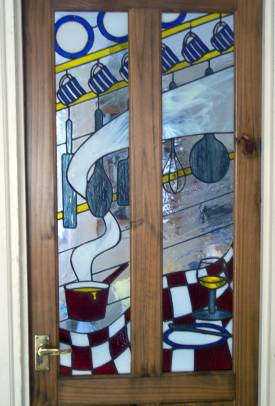
This design was created to replace two long glazed glass kitchen door panels in my small London Victorian terraced cottage. Since this door connects the kitchen and dining room, I wanted my design to have a kitchen theme that would flow across both panels and also allow plenty of light through since this is an interior door. Although the house is about 120 years old, the original doors had been replaced by a previous owner and I didn't feel constrained to produce or replicate a Victorian design.
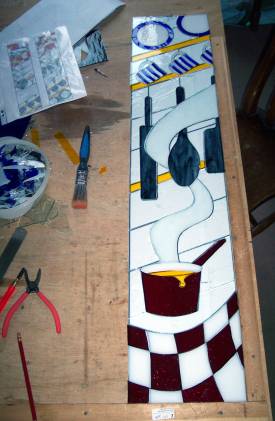
While creating my design, I had the idea of a kitchen "still life" but wanted to avoid being too representational. I spent a long time on various drafts of this, experimenting with images of food, kitchen utensils and cooking processes. The idea of a billowing red and white checkered table cloth that flowed across both panels kept coming to mind. I added the sloping lines and the winding column of steam to give the piece some sense of movement.
There's always a point at which you have to stop drawing and consider the practical possibility of the design. For example, what shapes can be cut, or what extra lines should be put in or removed to strengthen the design. When I first drew the rising steam in the left panel it was one piece of glass — possible, although difficult, to cut and vulnerable to fracture in a door panel. The solution of making it curl around the spoon made it stronger both structurally and aesthetically. The design does have a few weak structural points, particularly in those parts where a single piece of glass goes right across the panel. With this style of door, this was not a problem as it is kept rigid by the all-round wooden beading that holds the panels in place.
I used the Reflect feature of Glass Eye 2000 to construct the symmetrical shapes such as the spoons, the cup and the glass. I drew the left or right profile, selected the shape and then reflected it across the vertical axis. I dragged the two profiles together and the object was complete. I drew the cups upright. To get the necessary orientation I selected the object, chose the Group command to make it quicker to re-select and used the Rotate command to re-orientate it. It was simple to make five copies and position on them design.
I planned to construct the piece using lead came but eventually chose the copper foil technique because I wanted to keep the lines light and fine. In the construction, I did use a grinder for quite a lot of the shaping of the glass. There are pieces such as the saucepan drip (#162 and #167), the foot of the glass (#173) and several others (e.g. #133, #184 and #190) which would not be possible (at least for me!) to cut precisely with hand tools. Anyway, I prefer to grind the edges of glass for copper foil construction because cutting precision is much more critical with this technique. It also reduces the risk of glass cuts! The need for precision was most obvious in cutting out the blue and white stripes and the handles of the cups where each piece had to bed very closely together.
~ David Barrat
About the artist
David has been working with stained glass for about ten years and using Glass Eye 2000 for more than five. He was head of a large psychology department in a London college until he retired at age 56 which has left him more time to work on his hobby. He has done some commissioned work in southwest France where he has a second home and he has run courses for local people in the region of France. He is about to start work with a group of these trainees in a neighboring village who want to replace some plain glass panels in a local church with stained glass. David was previously featured in our September 2008 Design of the Month and you may reach him by email.
This pattern may be used to make one or more artworks for sale or personal enjoyment. This pattern may be printed for personal use only and may not be sold or given away in printed or electronic form.
Each month we feature a project designed using Glass Eye 2000. Do you have a project to share with the world? Contact Dragonfly Software and your creation might be our next Design of the Month.