This lesson introduces you to the essential features of Glass Eye 2000 in just a few steps. You'll learn how to:
![]() To start Glass Eye 2000, double-click the shortcut item on your desktop.
To start Glass Eye 2000, double-click the shortcut item on your desktop.
Another way to start the program is as follows:
1. Click the ![]() button on the Windows taskbar.
button on the Windows taskbar.
2. Choose ![]() from the menu that appears.
from the menu that appears.
3. Choose ![]() from the next menu that appears.
from the next menu that appears.
For this lesson, ignore any text or design you might see on the screen after Glass Eye 2000 starts. If a box appears asking you to register the product, you may do so now or just click the Cancel button.
We begin by looking at one of the designs in our pattern library. Each design is stored in a single file.
![]()
This is the Open button. Click on it to bring up the Open dialog box, shown below.
This dialog box shows you that you are currently looking at Glass Eye files in the folder called Glass Eye 2000. There is only one such file in this folder, which is the one containing the Welcome message. There are also seven sub-folders.
Double-click on the folder named "Dragonfly designs" and you'll see a collection of folders named for the artists and publishers that have supplied us with patterns. Next, double-click on the folder named "CKE Publications" to see the list of designs from that publisher:
This folder contains a collection of Glass Eye designs. You can be sure these are Glass Eye designs because the file names are preceded by the ![]() icon.
icon.
Double-click the word "Barnaby" to open that file. If you installed Glass Eye 2000 from a CD then you should see glass samples within the pattern. If you installed after downloading the software from our website, you'll see solid colors only because you do not yet have the full glass library.
 You can use the Resize command to set the precise width and height of your design. Try this now by choosing "Resize All" from the Modify menu. The
dialog box you see at the right will appear. (Don't worry if the values you see are different from the ones here.)
You can use the Resize command to set the precise width and height of your design. Try this now by choosing "Resize All" from the Modify menu. The
dialog box you see at the right will appear. (Don't worry if the values you see are different from the ones here.)
Here you can set the exact width and height of the design. Try this now by entering a width of 10 inches. Because the "Maintain proportions" box is checked, the height is automatically adjusted proportionally. (By unchecking this box you can set width and height independently.) After you click the OK button your design will be resized to the new dimensions.
Because the design is now much smaller than before, it fills only a fraction of the view. To enlarge its appearance, choose "Zoom All" from the View menu. The widths of the lines are not affected by the resizing, so you might find that the lines now appear too thick. Let's ignore this issue for now. We will discuss how to change lead size in Lesson 5.
The design is now the size we want, so let's print it. Before we do, make sure the printer is properly configured. Choose "Page Setup" from the File menu. When the Page Setup dialog box appears, choose the format "Actual size" and be sure the "Show border" option is checked. Choose the orientation "Portrait" and then click the OK button.
![]() To print this design, click the Print toolbar button or choose "Print" from the File menu. When the Print dialog box appears, click the OK button to print your entire design.
To print this design, click the Print toolbar button or choose "Print" from the File menu. When the Print dialog box appears, click the OK button to print your entire design.
By choosing a format of "Actual size" in the Page Setup dialog box you will get an actual size printout. The program will print efficiently to any printer properly configured in Windows, so if the design fits on the paper accepted by your printer then it will appear on a single sheet. Unfortunately, few users will have printers large enough to print a big design on a single sheet of paper. The only solution is to use tiling, which prints to several sheets that you assemble into a full-sized design. Here are the steps:
You have already completed this step by printing your design at actual size with the borders showing. Most likely this required four sheets of paper.
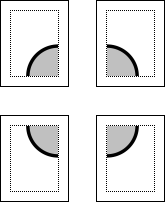
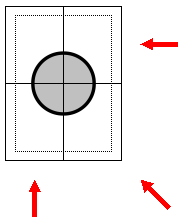
Cut off along the border with scissors or a paper cutter. Notice that you do not need to cut along all borders of every page. At most you need to cut along two borders, as the diagram shows.
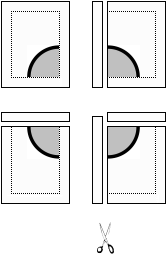
Assemble the trimmed pages to form the complete design. You can attach the pages with transparent tape, or you can spray mount the pages to a cardboard backing.
You should now have a custom-sized image of "Barnaby" on paper!
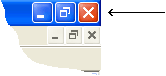
Exit the program now in the way common to all Windows programs: click the "X" box in the top right corner of the main window. Other ways to exit are to press Alt+F4 or to choose "Exit" from the File menu. When asked if you wish to save your changes to the design, click "No."