In this lesson you'll gain an advanced understanding of curves and arcs, including some of the limitations of arcs. You'll learn how to draw a perfectly horizontal, vertical, or diagonal line. Lastly, you'll learn about discontinuous lines and about joining and breaking lines.
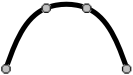
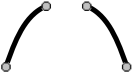
As you know, the way to draw a line is to specify the location of knots and to let the computer calculate the shape of a smooth line that passes through them. The smoothness property is important. For example, consider these figures:
The placement of the knots is the same in each case, but the figure on the left is smooth whereas the figure on the right has a sharp corner. This is because the figure on the left is composed of one line and the figure on the right is composed of two lines that share a common knot. Thus, keep this rule in mind as you draw:
Glass Eye 2000 supports two line types: curves (more precisely known as "spline curves") and arcs (more precisely known as "elliptical arcs").
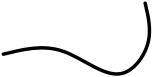
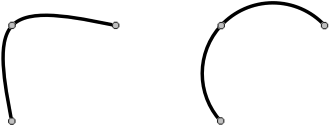
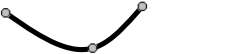
Think of curves as what you might get by drawing a graceful line freehand with pen and paper. To the right is a curve.
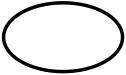
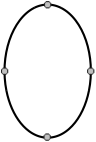
An arc is something else. It is always all or part of a circle or ellipse. To the right is an ellipse.
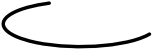
So an arc might look like this.

Only horizontal and vertical arcs are supported. An arc based on a tilted ellipse like this is not possible.
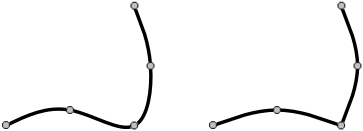
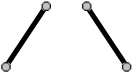
Now consider, for another example, the two lines at the right.
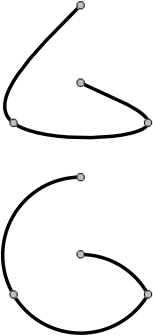
![]() Each line is fit through three knots arranged in the same pattern. But the line on the left is a curve, whereas the line on the right is an arc.
For the first part of this exercise, start a new design and then draw these two lines as shown. Use the Curve toolbar button or the Curve command on the
Draw menu to draw in Curve mode. Use the Arc command on the Draw menu to draw in Arc mode.
Each line is fit through three knots arranged in the same pattern. But the line on the left is a curve, whereas the line on the right is an arc.
For the first part of this exercise, start a new design and then draw these two lines as shown. Use the Curve toolbar button or the Curve command on the
Draw menu to draw in Curve mode. Use the Arc command on the Draw menu to draw in Arc mode.
There is a significant difference between curves and arcs: given more than three knots, there is always a curve that can be drawn through them,
but there is not always an arc.
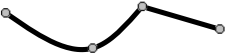
Consider the four knots in the figure at the right. Here you see a smooth curve going through the knots, but clearly there is no ellipse that touches all four of these knots.
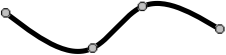
If you were to place knots in that configuration by distorting an ellipse, you would get something like what you see here. The line is
drawn as a series of arcs, which is the best the computer can do. Notice how the line is not smooth where it goes through the bottom right knot.
This illustrates the one exception to the rule that says that a line is always smooth: if no smooth arc goes through all the knots, the line will not be smooth.

There is yet another complication when drawing ellipses. Consider four knots arranged in the pattern at the right. There are many ellipses going through these points.
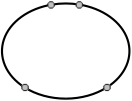
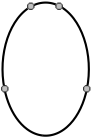
Which ellipse you get will be an arbitrary choice by the computer, so you might not get the shape you want with the knots so arranged. Therefore, it is recommended that when reshaping an ellipse you keep the knots at the top, bottom, left and right. For example:
When the knots are arranged like this there is no ambiguity.
Because of these complications, remember this rule:
A perfectly horizontal, vertical or diagonal line can be hard to draw. You could use crosshairs or grid lines for these, but a simpler way is to use the Shift key as we saw in Lesson 4. Let's try this now.
Use the "Drawing Properties" command on the Draw menu and make sure that the number of divisions is set to 8 and the angle of rotation is set to 0. Doing so will constrain drawing to the eight compass directions when the Shift key is held down. Click OK to dismiss the dialog box.
Now enter Curve mode by clicking the Curve toolbar button. Click anywhere on the screen to choose the starting point of the curve. Now before you click again, hold down the Shift key while you move the mouse in a circle around the starting point. Notice how the line is constrained to be horizontal, vertical, or diagonal. When you have the line the way you want it, double-click as usual to complete the line.
Let's say you have drawn the curve shown at the right. You are satisfied with the positions of these knots, but you wish to make the curve extend further to the right. What you would like to do is to add a knot somewhere off in space to the right of the curve, but there is no facility for adding knots except along existing lines.
 You could draw another line starting at the rightmost end of the current line, something like what you see here. This is not a complete
solution, however, because the resulting "line" is not smooth. It's not one line at all but two lines that connect at a knot.
You could draw another line starting at the rightmost end of the current line, something like what you see here. This is not a complete
solution, however, because the resulting "line" is not smooth. It's not one line at all but two lines that connect at a knot.
What you want is to join these two lines into one smooth line. Once combined, the resulting line would look like this.
![]() Try this now. First make sure the Sticky property is on. Having Sticky on will make sure the two lines you draw will share a common knot. Draw two curves
such that the ending knot of one curve is the starting knot of the other. You can approximate the shapes of the curves above or invent something of your own.
Try this now. First make sure the Sticky property is on. Having Sticky on will make sure the two lines you draw will share a common knot. Draw two curves
such that the ending knot of one curve is the starting knot of the other. You can approximate the shapes of the curves above or invent something of your own.
Now select at least one line section from each curve. You can use a select box or the Ctrl key while clicking to do this. Choose "Join Lines" from the shortcut menu. You must have line sections from exactly two lines selected for the "Join Lines" item to be available. After you choose this item, your two lines will be joined into one.
Sometimes you want to go the opposite way and break one line into two. Try this now by selecting one of the inner knots on the line and then choosing the Break command on the Modify menu.
 A distinguishing feature of Glass Eye 2000 is that the lines you draw need not be continuous. Try this by drawing something similar to the following curve, composed of three sections.
Now select the middle section and delete it. The result is this.
 See how the curve retains its shape even though a section is missing! What you have is one curve composed of two sections.
You know you don't have two curves, because if the delete operation had separated the curve into two the result would have been this, which you are not seeing.
See how the curve retains its shape even though a section is missing! What you have is one curve composed of two sections.
You know you don't have two curves, because if the delete operation had separated the curve into two the result would have been this, which you are not seeing.
You can easily reconnect a disconnected line. One way is to drag one knot over to another across the gap. Try this now. Enter Pick mode and drag one of the middle knots over to the other. If Sticky is on, the two knots will become one and the line will be continuous. Of course, you haven't restored the line to its original shape because now you have three knots instead of four. To restore the missing piece, we need another procedure.
Click the Undo button to make the line discontinuous again. Bridge the gap by drawing a curve across it; you now have two connected lines. Select the new line and at least one section of the original line, then choose "Join Lines" from the shortcut menu. The two lines combine into one and the curve is restored to its original shape.
 Discontinuous lines are common in stained glass design. Look at some window patterns and you will probably notice them. To the right is one example. The arcs along
the outside of the figure form a circle that has been made discontinuous by removing some of its sections.
Discontinuous lines are common in stained glass design. Look at some window patterns and you will probably notice them. To the right is one example. The arcs along
the outside of the figure form a circle that has been made discontinuous by removing some of its sections.
Close your design without saving it.
Most of the lines that you draw are H-came, meaning that the face width is centered along the heart thickness. The Professional and higher editions can make a U-came border around your design. The following diagram shows the difference:
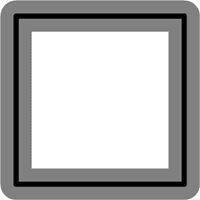
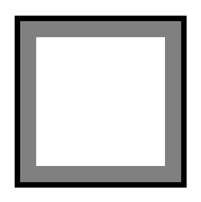
Try this now by starting a new design and drawing a square in it. Use the "View Properties" command and set a line appearance of "face and heart." Your square should look something like the first figure above. Now choose "Make Frame" from the Modify menu. (If you have the Standard Edition then you'll see a message informing you of your upgrade options; click "Proceed" to continue.) Your square will be transformed to have a U-came border like the one in the second figure. You can now continue to work with these lines as you would any other lines. Be sure that the Sticky option is enabled and try drawing some lines inside the square from one border line to another.
U-came lines are available as border lines only. If a line is not along a border, it cannot be made into U-came. Moreover, if one line on the border is U-came then they all must be.
Close your design without saving it.
Next Lesson: Moving and Resizing