In this lesson you'll create a design of your own. You'll learn how to draw curves and how to set values for both the face width and the heart thickness. Lastly, you'll learn how to save your design.
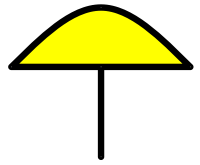 Now we'll create a design from scratch. To the right is what it will look like when completed. It's a mushroom, or perhaps an umbrella. Yes, we're
keeping things simple!
Now we'll create a design from scratch. To the right is what it will look like when completed. It's a mushroom, or perhaps an umbrella. Yes, we're
keeping things simple!
![]() To start a new design, click the New button. (You can also choose "New" from the File menu or simply press Ctrl+N.) You now have a blank design, which
you will add to during this lesson. This is like getting out a blank sheet of paper on which to write a new story.
To start a new design, click the New button. (You can also choose "New" from the File menu or simply press Ctrl+N.) You now have a blank design, which
you will add to during this lesson. This is like getting out a blank sheet of paper on which to write a new story.
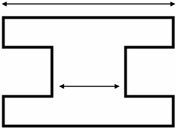
A line section is the part of a line that goes between two of its knots. Each line section in your drawing has a face width, which is the width of the visible lead in your window. Each line section also has a heart thickness, which is the width of the lead that sits directly between pieces of glass. Looking at the cross-section of a typical "H" came helps to make this clearer. For each line section you can make these widths whatever you like. You can even view and print your design showing the lead width, the heart thickness, or both, depending on your needs.
Before we begin drawing we will set the face width and the heart thickness for our lead lines. Choose "Default Line Properties" from the
Modify menu to bring up the dialog box you see to the left.
For face width there are eleven choices from solid and dashed hairlines (the thinnest) to ½" (the thickest), and all but the first two can be changed to whatever values you wish by typing a measurement directly into one of the boxes. Heart thickness values work similarly.
You can change your line color to any of six preset colors, or by double-clicking one of the custom colors you can make lines any color you wish.
Pick a face width of 3/16" and a heart thickness of 1/16", then click the OK button. Now every lead line we draw will be this size until we change the default size to something else.
![]() Before you start drawing, make sure you have the "Sticky" property on. The button looks like a shoe stepping on chewing gum. (If you are using a
low-resolution display you might not see this button. Use the "Sticky" option in the View Properties command instead.) Recall that a property is
active if the button looks pressed in. You want to have the Sticky property on as it ensures that lines will stick together automatically. You should
turn this property off only in unusual circumstances.
Before you start drawing, make sure you have the "Sticky" property on. The button looks like a shoe stepping on chewing gum. (If you are using a
low-resolution display you might not see this button. Use the "Sticky" option in the View Properties command instead.) Recall that a property is
active if the button looks pressed in. You want to have the Sticky property on as it ensures that lines will stick together automatically. You should
turn this property off only in unusual circumstances.
![]() To draw curves you need to be in Curve mode, so click the toolbar button shown here. The pointer changes to the shape of a pen, letting you know that you
are ready to draw. Let's draw the straight, horizontal line first. At a point just left of the center of the view, click the mouse. (Remember that
to "click" means to press the left mouse button down and quickly let go; do not "drag" the mouse.) Now move the pointer around the screen. A thin
straight line will be drawn from the place you clicked to the pointer, showing you the shape of the line you are creating. Move the pointer to the
right of the center of the view and double-click there. The double-click signifies that you are finished drawing that line. The line
will now be drawn in at its proper thickness.
To draw curves you need to be in Curve mode, so click the toolbar button shown here. The pointer changes to the shape of a pen, letting you know that you
are ready to draw. Let's draw the straight, horizontal line first. At a point just left of the center of the view, click the mouse. (Remember that
to "click" means to press the left mouse button down and quickly let go; do not "drag" the mouse.) Now move the pointer around the screen. A thin
straight line will be drawn from the place you clicked to the pointer, showing you the shape of the line you are creating. Move the pointer to the
right of the center of the view and double-click there. The double-click signifies that you are finished drawing that line. The line
will now be drawn in at its proper thickness.
If you don't like double-clicking, there is another way to terminate drawing. At the place you want to end the line do a normal, single click. After this, click the right mouse button and choose "Accept" from the shortcut menu. It doesn't matter if you move the mouse between those last two clicks. (The "Drawing Properties" command that you'll see in the next lesson lets you skip this menu if you wish.)
The horizontal line is complete. It's fine if the line is not perfectly horizontal. Now add the curved top. Click on the knot at the leftmost end of the horizontal line. Move the mouse somewhere above the center of the horizontal line and click again. Finish the top line by double-clicking on the knot at the rightmost end of the horizontal line.
Now add the stem by clicking on the middle of the horizontal line and then drawing a vertical line down. If you make any mistakes in this process, just click Undo and try again.
Having the Sticky property on made it easy to draw this figure. Notice how the knots of the horizontal line are shared by the beginning and ending knots of the curved line. And notice how the knot in the middle of the horizontal line sits directly on that line.
Switch to Pick mode and drag the rightmost knot around the screen, but don't distort the figure too much or you will end up with a mess! Notice how the figure hangs together. These are not just three lines but three connected lines. Having the Sticky property enabled tells Glass Eye 2000 to make these connections automatically.
Notice especially the behavior of the slider. Recall from the Overview that a slider is a knot that attaches to a line but does not affect the shape of that line. The slider in your figure is the white knot in the middle of the horizontal line. (Knots that are not sliders are gray.) That knot became a slider because you placed it in the middle of an existing line. Watch how the slider follows the horizontal line during movement.
Disable Show Knots and then color the body of the mushroom just as you colored the triangle in Lesson 4. The mushroom should now look more or less like the picture at the beginning of this lesson.

Put yourself back in Pick mode before you continue.
Let's see how the design looks with a thicker lead. Select all lines using a select box, or by pressing Ctrl+A, or by choosing "Select All" from the Edit menu. Now choose "Line Properties" from the Modify menu. Select a face width of ½" and then click OK.
If you like, experiment with changing the face width of just one line section. Or try using Undo and Redo to switch between different face widths to see how they compare.
![]() You can print your design at any time by using the Print command, just as you did in Lessons 1 and 2. If you would like to print only a portion of your
design, just select that portion before you use the Print command. (Note that the capability to print only a portion of your design is not available in the Standard Edition.)
You can print your design at any time by using the Print command, just as you did in Lessons 1 and 2. If you would like to print only a portion of your
design, just select that portion before you use the Print command. (Note that the capability to print only a portion of your design is not available in the Standard Edition.)
![]() Saving to disk in Glass Eye 2000 works exactly as in every other Windows application, so we will give only a quick description here. The easiest way
to save your design to a file is to click the Save button now. Because you have not yet named your design, the Save As dialog box will appear. At the
top of the dialog box you will see a folder name to the right of the words "Save in". You want to save your work in the Tutorial folder, and if the
name "Tutorial" appears here then all is well. If not, it should appear in the list of folders beneath this field and you will first need to
double-click on the Tutorial folder where you see it. In the field labeled "File name" type "Mushroom" and then press Enter. Your design is now saved
to disk under that name. You can now exit Glass Eye 2000 or continue on to the next lesson.
Saving to disk in Glass Eye 2000 works exactly as in every other Windows application, so we will give only a quick description here. The easiest way
to save your design to a file is to click the Save button now. Because you have not yet named your design, the Save As dialog box will appear. At the
top of the dialog box you will see a folder name to the right of the words "Save in". You want to save your work in the Tutorial folder, and if the
name "Tutorial" appears here then all is well. If not, it should appear in the list of folders beneath this field and you will first need to
double-click on the Tutorial folder where you see it. In the field labeled "File name" type "Mushroom" and then press Enter. Your design is now saved
to disk under that name. You can now exit Glass Eye 2000 or continue on to the next lesson.
Next Lesson: The Shortcut Menu and Quick Figures