In this lesson you will learn how to add text to your designs. This includes the ability to have arbitrary notes and instructions on your design, as well as having your pieces numbered automatically. You'll also learn how the "AutoTrace Text" command lets you incorporate lettering into your designs, a feature available in the Professional Plus and higher editions.
If you have the Standard Edition then text is not available, and piece numbering is limited to number-by-color.
Open the flag design once again. Press the Zoom Out key (the minus key) three times so that we have some working room around the flag.

![]() Click the toolbar button with the "A" on it, or choose "Add Text" from the Text menu. Doing so puts you in text mode. Your cursor will change to an
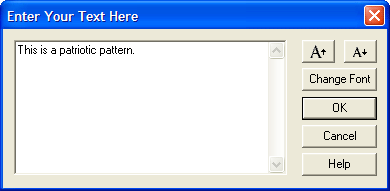
"A" with a right angle in the upper left. Move the cursor to somewhere off the flag and click once. A box will appear into which you may type any text you like.
Click the toolbar button with the "A" on it, or choose "Add Text" from the Text menu. Doing so puts you in text mode. Your cursor will change to an
"A" with a right angle in the upper left. Move the cursor to somewhere off the flag and click once. A box will appear into which you may type any text you like.
To move down a line of text simply hit the Enter key. Increase or decrease the size of your text or change its font using the buttons in the upper right corner. When you have completed your text, click the OK button.
You can move your text by dragging it with the mouse, just as you did with knots and lines. If you wish to change your text, double-click on it and then make your corrections.
![]() If you wish to hide text temporarily then use the Show Text command, which will toggle text on and off.
If you wish to hide text temporarily then use the Show Text command, which will toggle text on and off.
Before we continue, delete any of the text you've added by clicking on it and then pressing the Delete key. Once you've removed all the text, press the Enter key to Zoom All.

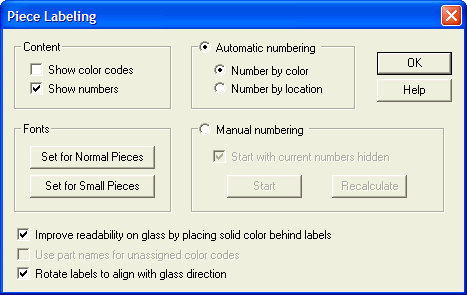
Automatic piece numbering is one of the handiest features in Glass Eye 2000. Just select "Piece Labeling" from the Text menu and then check
"Show numbers." You'll immediately see each piece in your design uniquely numbered.
If the numbers appear either too large or too small, you can change the font by clicking the "Set for Normal Pieces" button. Note that there is another button used to set the font used for small pieces. Glass Eye 2000 will use this font if the piece is too small to contain the number at the normal font.
If you have the Professional or higher edition, or are in trial mode, there are more options available. Look at the area labeled "Automatic numbering." When you choose "Number by color" then the numbering is color grouped so that numbers assigned to a particular color are consecutive. When you choose "Number by location" then your pieces are numbered strictly top to bottom regardless of color.
"Manual numbering" is needed only when you want total control over the assignment of numbers to pieces. If you're curious about it, click the "Help" button for a complete explanation.
When you're ready, uncheck "Show numbers" and then click the OK button.
You'll recall from Lesson 9 that the Color Selector has an area for defining a code for any color. In our flag example we could assign R to red, W to white, and B to blue. Or you could use the letters A, B and C — the choice is yours. If you have the Standard Edition this feature is not available, so you should skip this part of the lesson.
Try this now by double-clicking the white color button to bring up the color selector. For "Color code in this design" enter the letter A and click the OK button. Following the same procedure, give red a color code of B and blue a color code of C. Now choose "Piece Labeling" from the Text menu and check "Show color codes." You will now see your codes within each piece. Now check "Show numbers" as well to see both color codes and numbers.
The codes you assigned are applied individually to each design, so different designs can have different coding systems. If you wish to have a system of codes that applies uniformly across designs, enter your code instead into the field labeled "Color code across designs."
Before we end this lesson, notice the two options at the bottom of the Piece Labeling dialog box. The "Improve readability…" option is provided because piece numbers can be hard to read when placed on highly textured glass. Enabling it causes the piece number to be placed within a rectangle of solid color. The "Use part names for unassigned color codes" option is a quick way of using the glass part names as the labels for your pieces. Experiment with these options now if you wish.
Close the flag design without saving it.
 The text you put into your designs using the "Add Text" command is intended for annotations or instructions. The text cannot be colored or rotated, nor
does that text contribute to the calculation of materials usage, a feature you'll see in the next lesson. If you'd like to make text part of your
design, use the AutoTrace Text command.
Try this feature now. Start a new design and add text to it using the "Add Text" command. Click the "Change Font" button and select a font size of 72 so that your lettering is around ¾" high. After clicking OK, press the Enter key to do a Zoom All, making the text large in the view. Now select the text and then use the "AutoTrace Text" command on the Text menu. (If a license notification message appears, click the "Proceed" button.) When the trace is complete you will be asked if the original text should be deleted; click the "Yes" button in reply. You will now see lines in the shape of your original text. (The width of those lines depends on your default line properties settings. If the lines appear too fat, try using the "Show Hairlines" command.) You can now fill your text with glass colors and manipulate these lines like any others in your design. To learn more about AutoTrace Text, consult the Help system.
Close this design without saving it.
Next Lesson: Design Properties and Browsing