In this lesson you'll learn how to use five commands for moving and resizing your designs:
Once you have made a figure out of lines, there are several features available that allow you to position and size that figure exactly the way you want. We'll use the "Mushroom" file once again, so open that file (in the Tutorial folder) now. Zoom Out twice (by pressing the "–" key) to reduce the image of the mushroom.
The five commands discussed in this section are found on both the Modify menu and the shortcut menu, introduced in Lesson 6. To simplify, we will assume that you will use the shortcut menu for all menu selections, but you can use the Modify menu if you prefer.
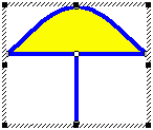
One method of resizing is stretching. Choose "Stretch All" from the shortcut menu. Doing so places a stretch box around the entire figure.
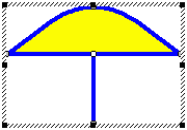
You can now stretch the box by dragging one of the eight resize handles that lie on its perimeter. Each handle provides a different
stretching operation. For example, by dragging the handle in the middle of the left side of the stretch box, you can make the mushroom fatter or thinner.
Experiment with the stretch box now. Try dragging some of the handles to resize the figure. You must position the pointer precisely over the handles — notice how the pointer changes when you do so. If you don't grab a handle but put the mouse within the stretch box and drag, you will move the selection without changing its size.
You can change the way stretching occurs by using the Shift or Ctrl keys while you drag a handle. If you hold down Shift, the box maintains its aspect ratio, meaning that the proportion of width to height is kept constant as the box is resized. Experiment now by holding the Shift key down while you drag a handle and the meaning should become clear.
The other option is to hold down the Ctrl key, which causes the box to maintain its center while it is resized. Give this a try now. Also try holding down both the Shift and Ctrl keys. They work quite well together.
Remove the stretch box now by pressing the Escape key or by switching to another mode, such as Pick mode.
We already saw how to use the Resize command in Lesson 1 so we won't repeat that exercise now, but here are a few more things to know about resizing your patterns.
First, as in all dialog boxes, the figures you are shown for the height and width when the dialog box first appears are rounded as specified in the
Units and Precision dialog box. See Lesson 2 if you need to review units and precision.
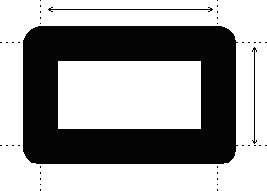
Second, for typical H-came the widths and heights are measured from the middle of the lead lines. The diagram to the right, with some very thick lead lines, should make that clear.
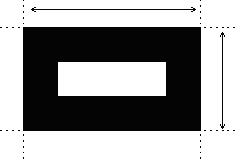
Measuring in this manner allows you to change the lead size and not affect width or height as understood by the computer. For U-came borders, the width and height are measured from the outside. Note that changing border lines to U-came still does not change the overall dimensions of the border.
If you use H-came borders and need a precise width or height as measured from the inside or outside edge of the lead, add or subtract the lead size from your measurements to compensate.
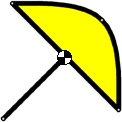 The Rotate command allows you to rotate your design (or a portion of it) around a point. Try this now by choosing "Rotate All" from the
Modify menu. The cursor changes to a new shape and a black and white pivot-point marker is placed at the center of your design. Position the
cursor in some blank area of the view, hold down the left mouse button, and drag. Your design will rotate around the pivot point.
The Rotate command allows you to rotate your design (or a portion of it) around a point. Try this now by choosing "Rotate All" from the
Modify menu. The cursor changes to a new shape and a black and white pivot-point marker is placed at the center of your design. Position the
cursor in some blank area of the view, hold down the left mouse button, and drag. Your design will rotate around the pivot point.
As you move the mouse you'll notice a numeric display next to the cursor indicating the degrees of rotation. This value is precise, meaning that your design is rotated by exactly the amount shown. By default the rotation angle is rounded to the nearest 1° but this value can be changed using the Units and Precision command you saw back in Lesson 2.
You can have greater precision by holding down the Ctrl key while you rotate. Doing so will increase the precision by a factor of ten. Try this now, and you'll see your rotation precision change from 1° to 0.1°.
The pivot point of the rotation can be moved. To do this, click at some other point in the view. The pivot point will move to the new location and will become the center of subsequent rotations.
You can use the arrow keys to rotate even without choosing the Rotate command. Hold down the Alt key while pressing the up arrow to rotate clockwise or the down arrow to rotate counterclockwise. You'll first have to select the lines to rotate for this method to work, however.
To leave rotate mode, use the ESC key or select another mode from the menu.
There is something to look out for when using the Rotate command. As discussed in Lesson 15, tilted arcs are not supported, so if you rotate
arcs by angles other than 0°, 90°, 180°, or 270° (or their equivalents) you will probably end up with a strange design. Try this now. Choose
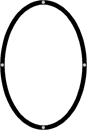
"Ellipse" from the Draw menu and draw an ellipse somewhere off to the side of the mushroom.
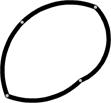
Now select the entire ellipse and rotate it. At times while you rotate you'll see a figure like this. The result is a series of
connected arcs, which is probably not too useful. Go ahead and delete this figure now!
The Move command moves (or copies) the selection horizontally and vertically by specified amounts. You use Move primarily if normal dragging with the mouse does not give you enough precision on the distance of movement.
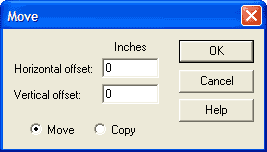 Let's try it now. Select some part of the entire mushroom (perhaps a knot or a line section), then choose "Move" from the shortcut menu.
You will see this dialog box.
Let's try it now. Select some part of the entire mushroom (perhaps a knot or a line section), then choose "Move" from the shortcut menu.
You will see this dialog box.
Type in 2 for the horizontal offset, 3 for the vertical offset, and choose "Move." Click OK and your selection will move up and to the right by those amounts. If you don't like the result, click the Undo button to reverse the change. Also try the experiment with a Copy instead of a Move.
Scaling causes a selection to be resized by specified scale factors. This is much like using a stretch box, but it gives you precise control over the amount of resizing. Thus, if you wanted to double the size of a design you could scale by a factor of 200% and the design would be exactly twice as big as before.
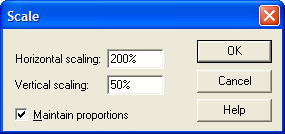
Choose "Scale All" from the Modify menu to bring up this dialog box. Uncheck the "Maintain proportions" option so that you can set the horizontal and vertical scale factors independently.
Type in 200% for the horizontal scale factor and 50% for the vertical scale factor. Click OK and you will make your design twice as wide and half as tall.
A value of zero is acceptable as a scale factor. This is useful as a way of making a line perfectly horizontal or vertical. Let's try this now.
![]() Somewhere in the view draw a wavy line that stretches out horizontally, something like this. Now enter Pick mode and select the
entire line. One easy way to do this is to double-click on it: double-clicking on a line selects the whole line, not just one of its
sections. Once the entire line is selected, choose "Scale" from the shortcut menu. Type in 100% for the horizontal scale factor and 0% for
the vertical scale factor. Click OK and the line will be squashed flat!
Somewhere in the view draw a wavy line that stretches out horizontally, something like this. Now enter Pick mode and select the
entire line. One easy way to do this is to double-click on it: double-clicking on a line selects the whole line, not just one of its
sections. Once the entire line is selected, choose "Scale" from the shortcut menu. Type in 100% for the horizontal scale factor and 0% for
the vertical scale factor. Click OK and the line will be squashed flat!
Close the current design, but don't save your changes.
Next Lesson: Flip, Reflect and Repeat