Design of the Month · February 2007
-

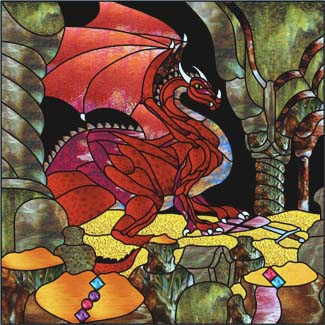
"Dragon's Lair"
Background
I have always had a fascination with mythology, mythical creatures, and fairy tales. As a teenager I read countless fantasy novels and books on the world's great romantic literature, including Norse myth, the King Arthur legends, Greek mythology, Roman mythology, the Brothers Grimm fairy tales, Aesop's Fables, American tall tales, the Icelanders' sagas and Eddas, and such. But one set of fantasy literature captured my imagination like no other: J. R. R. Tolkien's world of The Hobbit and Lord of the Rings.
This design is a scene from "The Hobbit." Behold Smaug — the dragon under the Lonely Mountain — and he is sitting on top of his horde of looted dwarvish treasure. The scene is just prior to Bilbo Baggins, the hobbit, sneaking into the dragon's lair. The inspiration for this design comes from a painting by the Brothers Hildebrandt in their 1977 Tolkien wall calendar.
This is one of the few designs I have done that wasn't based on a commission. Each year I do one "show piece" to take to fine art/fine craft shows, and this year I chose the Dragon's Lair as my show piece. This work is not for sale — it is in my private collection now, beside my "Lord of the Rings" movie posters and replicas of the movie's swords.
The design
Since I was not constrained with specific installation requirements, I was able to design the Dragon's Lair to suit my own aesthetic vision. It is a 30" x 30" square, framed in 2" oak with a very dark stain.
I used a lot of fine very dark ring mottle and cat's paw for the background glass. This adds depth and texture to stone surfaces. The background around the dragon is deliberately a smooth black glass. I do this so that the solder lines disappear with an application of black patina. Also, the details for the ridges along the dragon's back and across his head are painted with a high-glass black enamel. Instead of cutting many tiny pieces of red and black glass, simply cut one or two larger pieces of the iridescent mixed-color glass, then paint the black background to define the ridges. This is done for four pieces: two larger pieces which define the dragon's back, one on the curve of his neck, and one at the top of his head between the two white horns. For the tip of the tail, paint the detail in black onto the gold background glass. I also use the same high-gloss enamel paint to define the eye's pupil and the nostril.
There are many excellent high-textured gold glasses which give the look of a mound of gold. I particularly like to use granite streaky gold and gold/brown glass to achieve this "rich" look. Adding 1" round and square jewels to the design enhances the look of the treasure. Place them where you like. The ones in the design are only suggestions. You might also want to replace the grey glass in the sword and shield with mirrored glass, to give a very striking metallic look.
Construction
This panel requires the use of the copper foil method. I printed out two full-sized copies of the design, and used one as a reference layout and the other was cut apart and glued onto the glass. I like this method of using patterns, since all the glass is opaque (usually very dense) and it is critical that the pieces are cut and ground to exact outlines. For the jewels, I placed them directly onto the pattern, and traced around them.
I first cut out all the pieces, ground them, and foiled everything. The pieces were laid out on top of the pattern and soldered. Since the jewels are dimensional, I used a large piece of ½" bubble wrap as a cushion while soldering the back side. After soldering, I added a frame of 1/8" U-channel zinc. After soldering, I cleaned it thoroughly and added black patina. After washing that, I waxed and polished it, then framed it in its final wooden frame.
Home & Garden TV
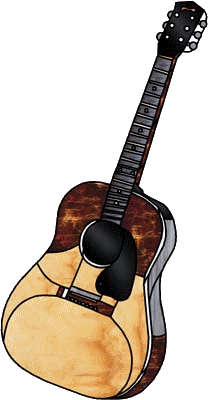
If you want to watch me making one of my stained glass creations, check out HGTV (Home & Garden TV) on February 9th at 1:00 EST on the show titled That's Clever. The HGTV gang flew out to the Art Glass Ensembles studio back in April 2006 and spent a couple of long days filming me making a Gibson guitar which is featured my CD of Glass Eye 2000 designs titled Opus One. Seems the producer of "That's Clever" regularly scouts for unusual craft items by browsing websites within a 100 mile radius of a city where they are scheduled to do a shoot. They discovered my website, and saw the Gibson guitar, and contacted me about filming. After clearing legal hurdles (thanks Michael from Dragonfly Software!) they came out and we had some fun. When you see the show, it looks like I made a stained glass guitar from start to finish in only 30 minutes. In reality, I made three versions of the guitar to use during filming: one mostly cut out into pieces, but a few pieces left to show how I cut glass; one already foiled, but with a few pieces left to show foiling and soldering; and a nearly-finished "hero" guitar to show back-side soldering and then the finished product.

It is January when I'm writing this article, so I have not seen the program yet. I do know that they had me goofing off (it is a trademark of that particular show), so I suspect I will come across as kind of goofy. But hey, I am kind of goofy in real life, so don't be surprised. I do hope they bleeped out the one naughty word sputtered when a particularly difficult long, thin piece of white glass decided to not cut well on camera. And please forgive my "singing" (if they left that part in). I really can sing nicely — honest!
~ Christie A. Wood
About the artist
Christie A. Wood has been working glass since 1993, when she took her first beginning copper foil class at a local stained glass retail store. What started out as a hobby soon became an obsession, and then a profession. After working out a business plan, Art Glass Ensembles was launched in 1995 as a part-time studio. In 1996 it became a full-time studio, servicing the needs of the retail giftware market. In 1998 Art Glass Ensembles purchased the "Something Special" line of stained glass cabinet inserts, and became a full-service stained glass manufacturing studio. Christie and her husband relocated from Pennsylvania back to their home state of Texas in 2001, when Art Glass Ensembles continues to grow and flourish. She now has three CDs of patterns in Glass Eye 2000 format available: Opus One, The Glass Menagerie, and In Nature's Realm. Christie would be happy to answer questions sent to her email address.
This pattern may be used to make one or more artworks for sale or personal enjoyment. This pattern may be printed for personal use only and may not be sold or given away in printed or electronic form.
Each month we feature a project designed using Glass Eye 2000. Do you have a project to share with the world? Contact Dragonfly Software and your creation might be our next Design of the Month.