Design of the Month
-

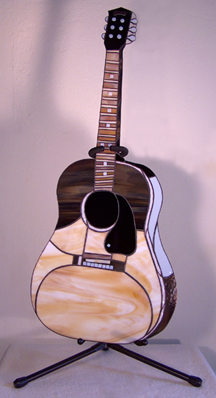
"Gibson"
Background
In 2000 I was approached by a client searching for a unique stained glass design. This meeting was exploratory only — not an order. I never got a chance to do an actual consultation. He didn't have a clear idea of what he wanted, much less the size of the project or where it would be installed. About the only thing I learned about this gentleman was that he was a collector of rock 'n' roll memorabilia.
This clue lead to the design of three stained glass free-form guitars. I wanted to present a variety of designs, hoping he would select one or more and order a commission. Alas — he had moved onto other projects and the designs were abandoned. I was left with three exciting guitar designs, and a burning desire to construct at least one of them. I went ahead and constructed the Gibson Guitar anyway, simply for my own enjoyment.
By this time Dragonfly Software had approached me with releasing a collection of my favorite designs. The three guitar designs ended up being released on Opus One. It was after the designs were released that I actually constructed the Guitar.
After completing the Gibson Guitar, I photographed it and entered it in Delphi's 2004 Online Art Glass Festival. It won first prize in its category. I took it, and its brother, the Rickenbacker Guitar, to a fine art show in Austin, Texas in July 2004, and both were featured on multiple television shows.
The Design
My main goal was to make as realistic a depiction on a classic early rock 'n' roll acoustic guitar as possible. I asked several guitar enthusiasts to name their all-time favorite guitar manufacturers and models. The Gibson Classic from the 1950's was always mentioned as an icon. So I went to their website and browsed through their collection on on-line catalogs dating back into the 1930's. I selected the 1956 catalog and downloaded a page with several guitars pictured.
I used Adobe Photoshop to crop the image and sharpen it. I then loaded it into Glass Eye 2000 as a background image. I traced over the image, adding break lines where necessary, and trying to match glass samples provided with the color and textures apparent in the photo. I used the Dimension feature to size it up to the true size of an actual guitar. I did this so that I could display it in an actual guitar stand, and store and transport it safely by putting it into an actual guitar case.
The result was a 3-D looking design which calls upon a number of advanced skills in order to be successfully executed. I consider it to be a successful design as it has literally stopped people in their tracks when they see it in a window or on display at my booth at a show. It is truly an attention-getter.
Construction
I printed out two full-sized copies of the design, then printed out extra pages which have the overlay pieces on them. The detailed inlay white "buttons" on the neck, the tuning screws down below the bridge, and the sound bar are all separate non-foiled pieces which are glued onto underlying glass later.
I first cut out all pieces, ground them, and foiled everything except the overlay pieces. The guitar body was laid out on top of the pattern, and brass Restrip placed in-between major sections, strengthening and tying together the vulnerable neck piece to the body. Two pieces of Morton brass-clad steel StrongLine were cut and pinned from the top of the neck along the outside of the neck piece, leading down to join at the black circle in the body. This was crucial to integrating the neck structurally into the body so that it would be supported from the inside of the guitar and then up.
I soldered the front side first, then CAREFULLY turned it over and soldered the back, adding two additional lines of StrongLine along the back of the neck and again going deep into the body. This makes four strips of steel connecting the neck to the body. It is so strong that I have no problems handling the guitar the same way you can handle a real guitar — such as lifting it by the neck.
After soldering, I cleaned it thoroughly and added black patina. After washing that, I waxed and polished it, then glued the detail pieces onto the front.
Revising the Pattern
This pattern may be modified so that it becomes a wall hanging, rather than being displayed in a guitar stand. Cut copper wire and make three hanging loops. Solder them to the back of the design: Two on either side of where the neck joins the body, making sure to run a good length of the copper wire along a strong solder line down inside the body. These support the weight of the guitar. The final hanging loop should be soldered where the neck joins the tuning pegs at the top. This loop is more of a stabilizer, and is not intended to support the weight of the stained glass guitar.
~ Christie A. Wood
About the Artist Christie has been working glass since 1993, when she
took her first beginning copper foil class at a local stained
glass retail store. What started out as a hobby soon became an
obsession, and then a profession. After working out a business
plan, Art Glass Ensembles was launched in 1995 as a part-time
studio. In 1996 it became a full-time studio, servicing the
needs of the retail giftware market. In 1998 Art Glass Ensembles
purchased the "Something Special" line of stained glass cabinet
inserts, and became a full-service stained glass manufacturing
studio. Christie and her husband relocated from Pennsylvania
back to her home state of Texas in 2000.
Christie has been working glass since 1993, when she
took her first beginning copper foil class at a local stained
glass retail store. What started out as a hobby soon became an
obsession, and then a profession. After working out a business
plan, Art Glass Ensembles was launched in 1995 as a part-time
studio. In 1996 it became a full-time studio, servicing the
needs of the retail giftware market. In 1998 Art Glass Ensembles
purchased the "Something Special" line of stained glass cabinet
inserts, and became a full-service stained glass manufacturing
studio. Christie and her husband relocated from Pennsylvania
back to her home state of Texas in 2000.
This pattern may be used to make one or more artworks for sale or personal enjoyment. This pattern may be printed for personal use only and may not be sold or given away in printed or electronic form.
Each month we feature a project designed using Glass Eye 2000. Do you have a project to share with the world? Contact Dragonfly Software and your creation might be our next Design of the Month.