Design of the Month
-

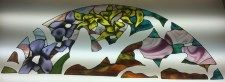
"Butterfly and Flowers"
This design began with only two requirements: it should greatly reduce the glaring morning light coming in through an eastern exposure, and it should be beautiful. I set about thinking what the client might like, given her carte blanche direction, and drew up a rough concept, as I am inclined to do these days, on my iPad.

I use Procreate and an Adonit Jot Touch with Pixelpoint pressure-sensitive stylus to create sketches on my iPad. It is a wonderful drawing app for those rough concepts that you want to get down quickly before the thought is gone. Doing this digitally offers me the ability to change colors freely and to move elements around until I get something much closer to the final idea. The first incarnation was very rough. I showed a colorful border with rough-hewn nuggetlike gems around a scene of flowers and a butterfly.

I thought this was a good start, so I brought the sketch as a background into Glass Eye 2000. I use the software on a iMac via Parallels and interface using a Wacom Intuos Pro 5 Touch. This allows me to draw lines naturally and gives me the ability to switch between functions quickly using the customizable express keys on the side. Having already made a border of the size needed for the actual window, in Glass Eye 2000 I scaled the background to match the border. I then traced the design to get most of the details in place, removed the background and then refined, refined, refined. With the "Sticky" feature off I created the wire overlay lines that form the details on the leaves. Then I added color to each of the pieces.

Since the design requires painting on some pieces and I needed to present the image to my client as realistically as possible, I exported the design as a JPEG and brought it into Photoshop (in other cases I've used Sketchbook Pro or Procreate) to add shading and various other details that made the drawing crisp and clean.
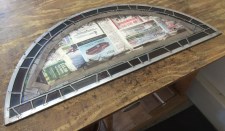
Once the drawing and pricing was approved, I began construction. I printed two full-size patterns on a 24″ HP printer so that I would have minimal tiling to do. I used one as a full-size cartoon, and the other I cut with regular scissors. I traced and cut normally, occasionally using a ring saw. Shaping was done using two grinders with bits of differing sizes and coarseness. I placed the pattern under a large sheet of clear waterproof Graphix film so I could put my wet glass pieces directly on the surface without ruining the pattern paper. Once shaping was done, I washed, cleaned and dried my parts. For any pieces that were clear, I marked the edge with a black Magic Marker to prevent any silverish cast when viewed from an angle; even the black-backed foil I use doesn't fully prevent this undesirable effect. All pieces were then foiled and soldered together.

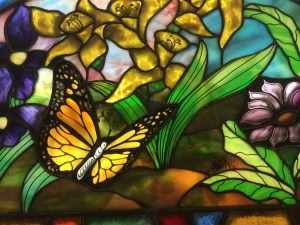
The panel needed to be darker than normal to reduce incoming light, so I plated the window to create that darkness and to add richness and complexity. This means that many areas would have not one but two layers of glass. Putting together the two layers using all the colors available created the rich palette I was looking for. Also, many pieces needed to be painted so they were individually hand-painted with vitreous glass paint and fired in a kiln in the traditional way.
Each piece was foiled and soldered together normally, which created the first layer. Then I soldered together the back panel (plated layer) in small sections according to their place on the design. Because the window had a traditional border, I leaded the outer section, incorporating the first layer into the lead up as if it were one large piece. Then I masked the foiled section front and back (to speed clean-up time) and cemented the panel. I removed the masking and cleaned the panel, added the wire overlay details, and finished with black patina on the front and select areas on the back.
 I cleaned the back of the panel again as well as the pieces of the plating layer
and then soldered the two layers together using minimal flux.
I finished up by carefully putting patina around the plated areas. The final step was to create and attach my signature bugs.
Now I can stand back and enjoy the panel before it is delivered and installed!
I cleaned the back of the panel again as well as the pieces of the plating layer
and then soldered the two layers together using minimal flux.
I finished up by carefully putting patina around the plated areas. The final step was to create and attach my signature bugs.
Now I can stand back and enjoy the panel before it is delivered and installed!~ Craig Bacon
About the artist
Craig Bacon is from Madison, Wisconsin and was raised by artistic parents. He is a two-time graduate of Kendall College of Art and Design in Grand Rapids, Michigan with BFA's in illustration and furniture design. He now works full-time as a furniture designer for a major furniture manufacturer. He has been running Craig Bacon Studio, participating in regional art fairs and executing custom commissions since 1994. His studio is located along the Mississippi River in Trempealeau, Wisconsin. He lives with his wife and seven year old son and enjoys reading about architecture, design and technology, watching great movies, and executing magnificent Lego creations with his son.
You can visit Craig's website and Facebook page, and you can follow him on X.
This pattern may be used to make one or more artworks for sale or personal enjoyment. This pattern may be printed for personal use only and may not be sold or given away in printed or electronic form.
Each month we feature a project designed using Glass Eye 2000. Do you have a project to share with the world? Contact Dragonfly Software and your creation might be our next Design of the Month.