Design of the Month
-

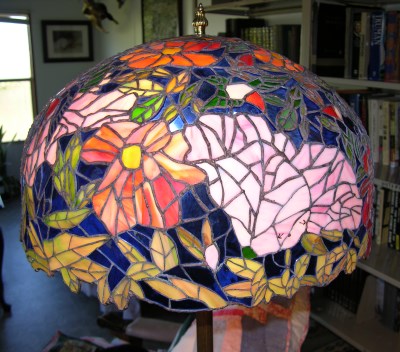
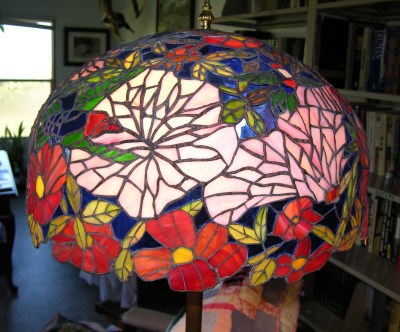
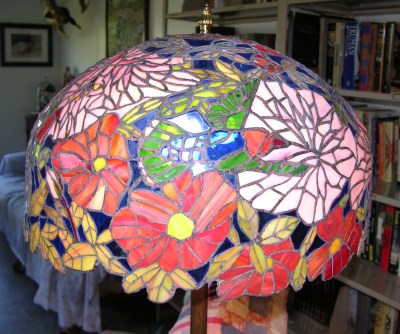
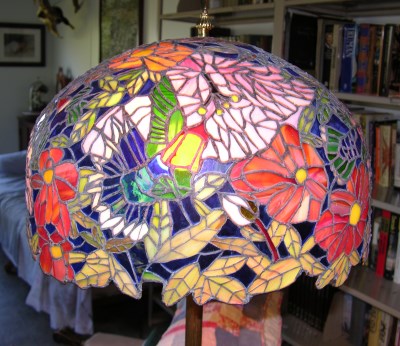
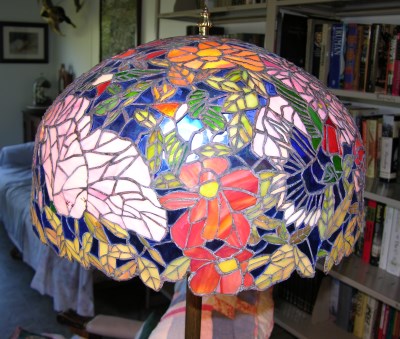
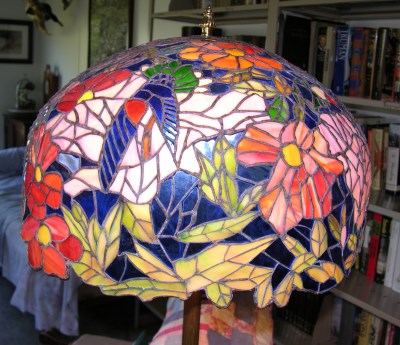
"Hummingbird Lampshade"
Note: The pattern included with this month's article is only a portion of the complete lampshade.
Construction of the hummingbird lampshade is done in two phases.
Phase One: Purchase a lampshade mold (without any design on it). The mold used here was purchased from Odyssey Lamp Systems. The mold needs to be mounted to a rotating base. Paint the mold with two-part epoxy white paint so that a pattern can eventually be drawn on it in pencil, and then traced with a Sharpie pen. To reuse the mold for another shade design just repaint over the drawn pattern. For my first design using this method, my wife, who is an artist, got the job of using a pencil to draw the basic design on the mold. Now that this lampshade is finished I am going to create a shade that is a dried flower arrangement, thus using the mold for another design.
Phase Two: After the basic design was made into glass pieces, the result was a design that had six hummingbirds in different flying positions, many single type roses, plus hibiscus flowers with leaves, for a total of 1760 pieces. Glass Eye 2000 was used to get the proper pattern on a flat sheet of paper to the correct size. Without Glass Eye 2000, the cutting of the pieces would have been very time consuming and difficult by hand-drawing the pattern using tracing paper pressed onto the mold.
The steps to do this are as follows:
- Draw the pattern on the mold to the correct scale.
- Use magic tape to tape an exact cross pattern with 1″ arms. Making several of these crosses and using double-sided tape instead of magic tape works also, and having several allows you to put the cross in another position without damage to the drawing on the mold when the tape is pulled off.
- Set up a digital camera on a tripod. For the first set of pattern copies, place the camera perpendicular to the mold as close to the surface as possible for the first rotation. Take the first picture with the cross in the center of the photo. As you do this, each photo will have an area in it that has piece sizes that are correct.
- Remove the cross and move it to the next area to be photographed. Rotate the mold a short distance so the cross is now in the center of the photo and all the adjoining pieces to the last photo are good to scale.
- Keep stepping the photos for the first complete rotation around the mold.
- Move the camera and cross down the mold for the next rotation so that the top of the next rotation set is in scale with the first rotation photos.
- Keep doing the movement of the camera and cross so that you photograph the complete mold pattern.
- Upload the complete set of photos to your computer in a format that Glass Eye 2000 will accept and then AutoTrace.
- After Glass Eye 2000 traces each photo, bring up the scale function and make the 1″ cross exactly to 1″ in the software. Now the small photo of a set of patterns are to exact scale.
- The pattern parts can now be printed as if they are flat and cut to make your glass parts.
~ Jerry Frankeny
About the artist
Jerry Frankeny, age 75, has been doing stained glass for 35 years. He is owner of Jer's Stained Glass Studio. He learned glass work from a local Austin artist and took a class in Oregon from Peter McGrain on how to do painted, fired glass for antique church window repair. Jerry no longer does much retail work but has a stained glass workshop and classroom in Taylor, Texas with one student and four former students using the space as a stained glass workshop. Jerry has also taught several beginner students and four workshops through the local Temple College adult education program. He built all the windows in two local Lutheran churches with a total of more than thirty windows. He now concentrates on doing his own projects like terrariums, nativity sets and lampshades.
This pattern may be used to make one or more artworks for sale or personal enjoyment. This pattern may be printed for personal use only and may not be sold or given away in printed or electronic form.
Each month we feature a project designed using Glass Eye 2000. Do you have a project to share with the world? Contact Dragonfly Software and your creation might be our next Design of the Month.